Wordpress Plugin Media Modal Upload Custom Folder Stackexchange

Exercise you desire to larn how to create a WordPress user registration course?
User registration forms make lives easier for websites that want to give their users the pick to sign up.
In this postal service, we'll show y'all the easiest fashion to create a user registration course in WordPress and so new users tin can register on your site within a few minutes.
Create Your User Registration Grade Now
Why Create a User Registration Form in WordPress?
There are tons of benefits to creating a user registration form on your website, only below are 5that stand out:
- Arrangement — When yous let visitors create a WordPress account and brand their own user profiles on your site, y'all'll take a recorded entry of all their important details needed to automatically add their account.
- Security— By requiring new users to submit a form with activation requirements, you will continue your WordPress site secure and stop user registration spam.
- Permissions— You can specify which level of access users that complete the class will take on your site and assign WordPress user roles.
- Membership Sites — Y'all can create a membership site using one of the best WordPress membership and member plugins on the market and require people to annals as a member using a registration class.
- Ease of Employ — Once users register for your site and log in via WordPress user login, they'll exist able to view their own user business relationship page and edit their profile within their WordPress dashboard.
Ready to let your users create an account and log in to WordPress? Hither's how.
WPForms is the best WordPress Form Builder plugin. Get it for free!
How to Create a User Registration Form in WordPress
To chop-chop navigate through this mail service, use the quick links below:
- Stride 1: Install WPForms
- Footstep 2: Activate User Registration Addon
- Step 3: Create a New Form
- Pace 4: Add and Customize User Registration Form Fields
- Step 5: Configure WordPress User Registration Form Settings
- Step 6: Configure User Activation Method
- Step 7: Alter Email Notification Settings
- Step 8: Edit On-Page Registration Grade Confirmation
- Pace nine: Configure User Registration Marketing and Payments (Optional)
- Step 10: Add together the User Registration Course to Your Site
Let's begin.
Stride ane: Install WPForms
WPForms is the all-time WordPress class builder. Information technology comes with user registration features, assuasive you lot to easily create a form that lets users annals and log in to your WordPress site.
To get started, the commencement thing you'll need is to install and activate the WPForms plugin. Make sure to buy the WPForms Pro plan because this includes the User Registration addon that we'll be relying on to create registration forms.
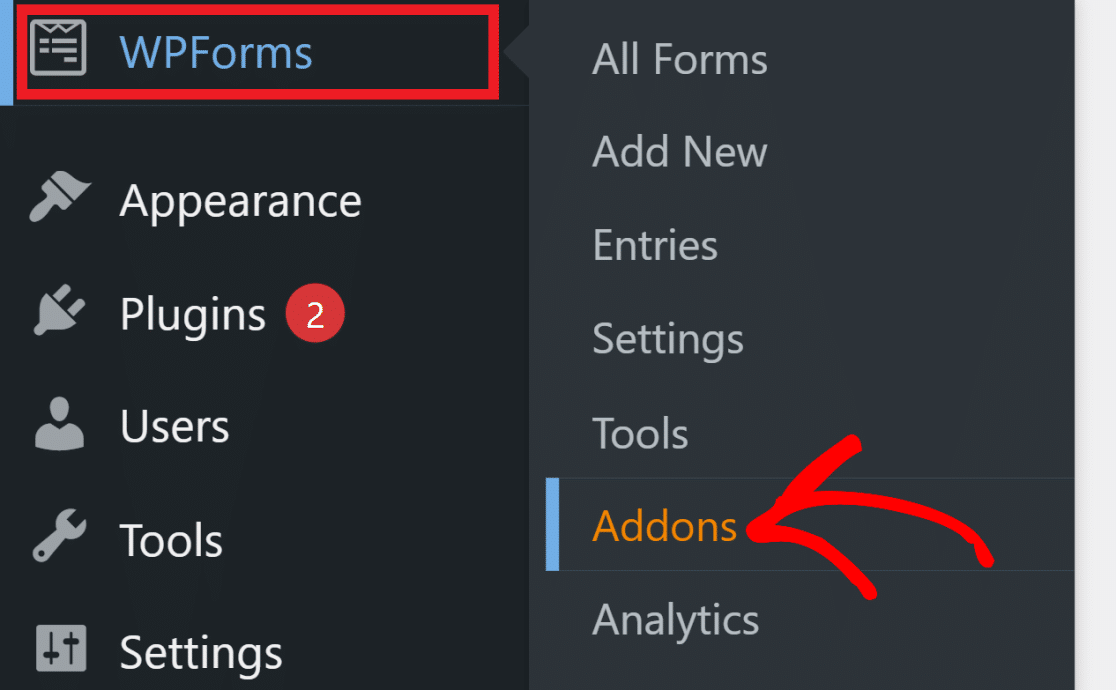
Step ii: Activate User Registration Addon
When you've installed WPForms on your site, the next footstep is to install and activate the User Registration addon.
To get this addon, head over to WPForms » Addons from your WordPress admin expanse.
This will open the WPForms Addons page. You can scroll through the listing of addons or just blazon in "user registration" in the search field to detect the User Registration addon.
Click on Install Addonto brainstorm installation.
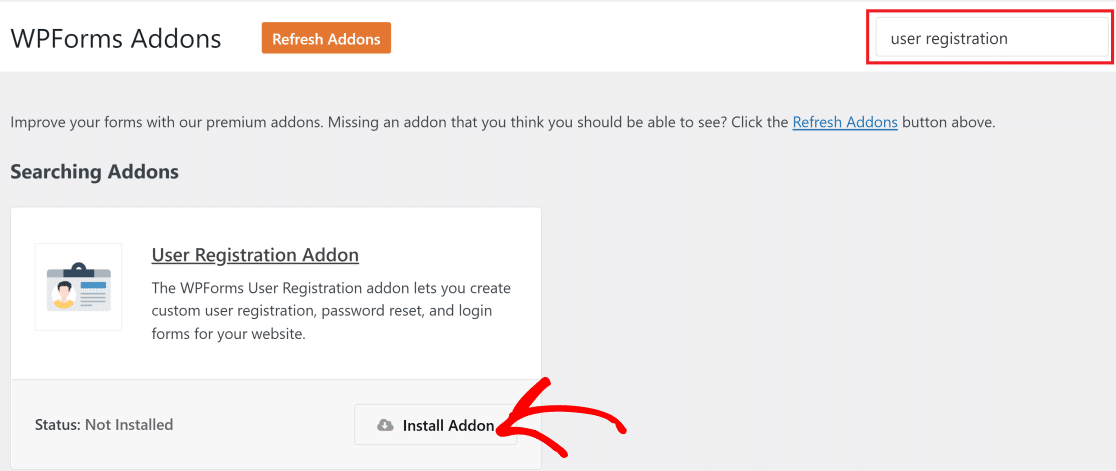
The status under the User Registration addon will now read Active.
Great chore! Now that the User Registration addon is ready, we tin starting time creating WordPress user registration forms using WPForms.
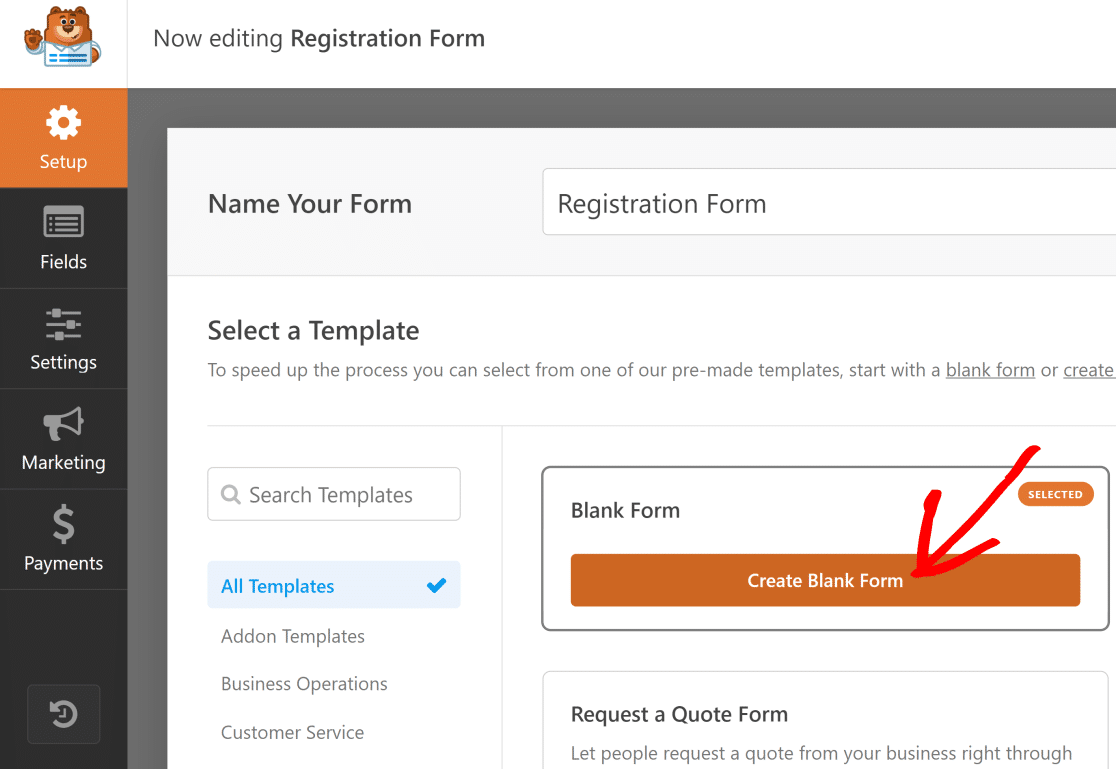
Pace 3: Create a New Grade
To create a new class in WPForms, click on WPForms » Add New. You'll now see the form setup screen where y'all can name your grade and select a template.
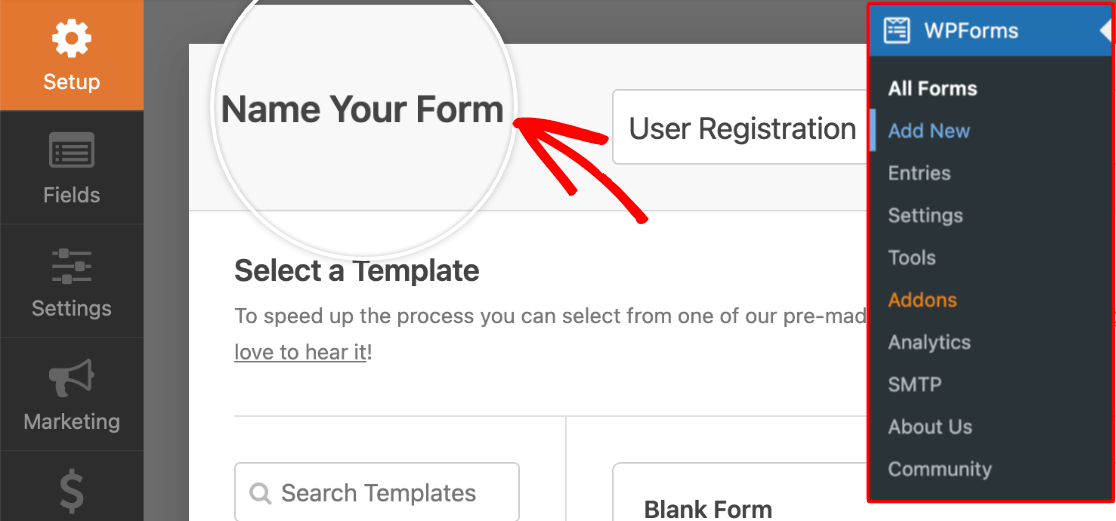
In this example, nosotros'll create the registration form from scratch, which is really like shooting fish in a barrel. Only if you want to practise this even quicker, you lot tin can also make a user registration grade from a template.
At present, click on the Create Blank Form.
You should now see the form architect screen. At this bespeak, the grade volition be empty since we chose to create a new class using the Bare Course choice.
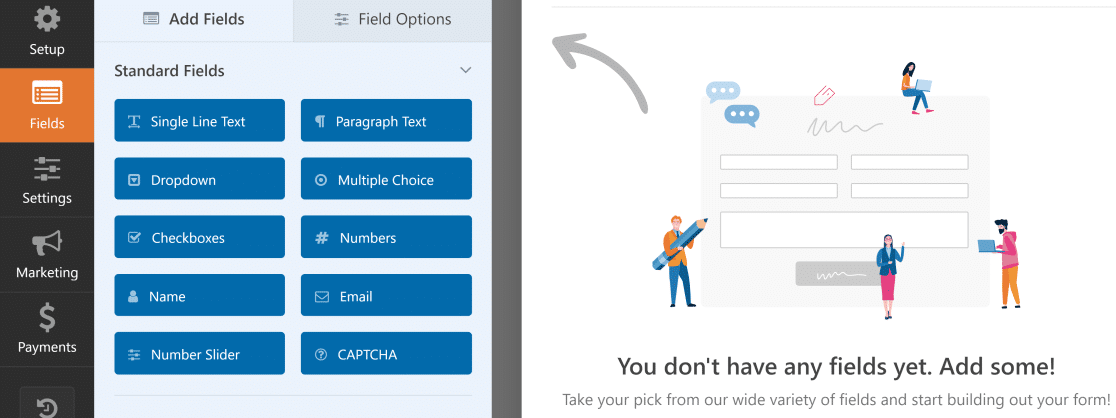
Allow's now add fields and customize our registration form.
Step four: Add and Customize User Registration Form Fields
We'll create a actually unproblematic registration grade, adding only the most important fields to it. Longer forms have a much greater chance of being abandoned by users, but you can still capture leads using WPForms' form abandonment addon.
At present, let'south add some fields using the uncomplicated elevate and driblet class architect. All you lot demand to exercise is select a field from the left-hand pane and elevate and drop it onto your class on the right.
Repeat this procedure until you've added all the desired fields. For our form, we added the following fields:
- Name
- Single Line Text (for username input)
- Password
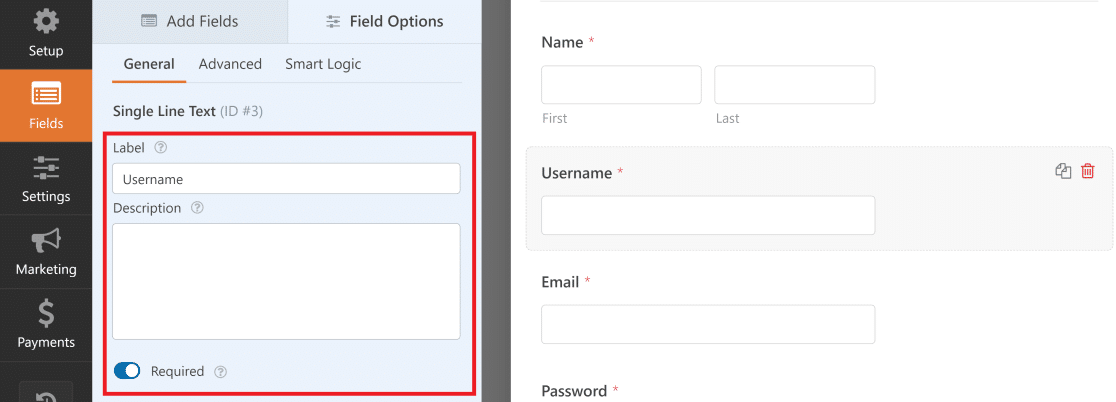
You can easily customize options for your form fields. For instance, we changed the proper noun of Single Line Text field to read Username,set up a maximum character limit, and added an input mask to command allowed characters for the username.
To customize whatever field, click on the field to open the Field Options. Under the General tab inside Field Options, you can alter the label of the field, add a description, and choose whether you want the field to exist a required one.
Normally, usernames only contain alphanumeric characters and no special characters. You tin enforce this requirement so that the Username field only accepts messages or alphabets.
To do this, click on the Avant-garde tab under Field Optionsfor the Username field. Then, scroll down to find the Input Mask option.
WPForms uses formulas to create Input Mask rules. In our example, we wanted to create a Username field that accepts numbers, uppercase letters, and lowercase letters and a character length betwixt 4 to xv.
To create this custom Input Mask, the formula is: ****[*{0,11}]
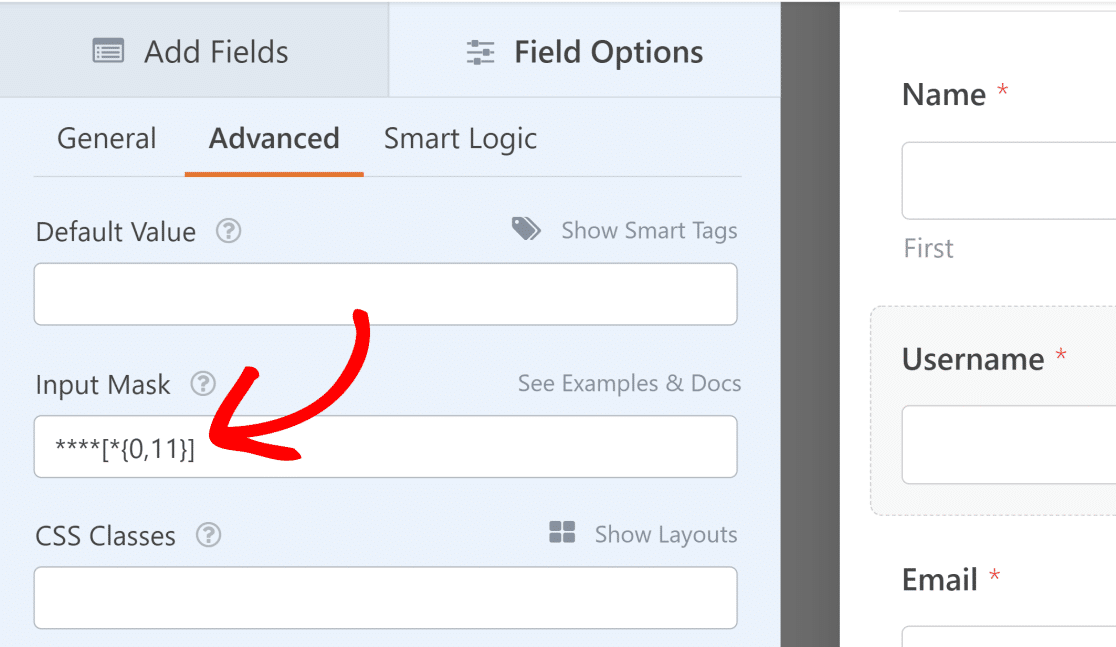
For more than data almost input masks, meet our doc guide on using custom input masks in WPForms.
Similarly, we customized the Password field in the Field Options to enable the Password Confirmation and Countersign Force options.
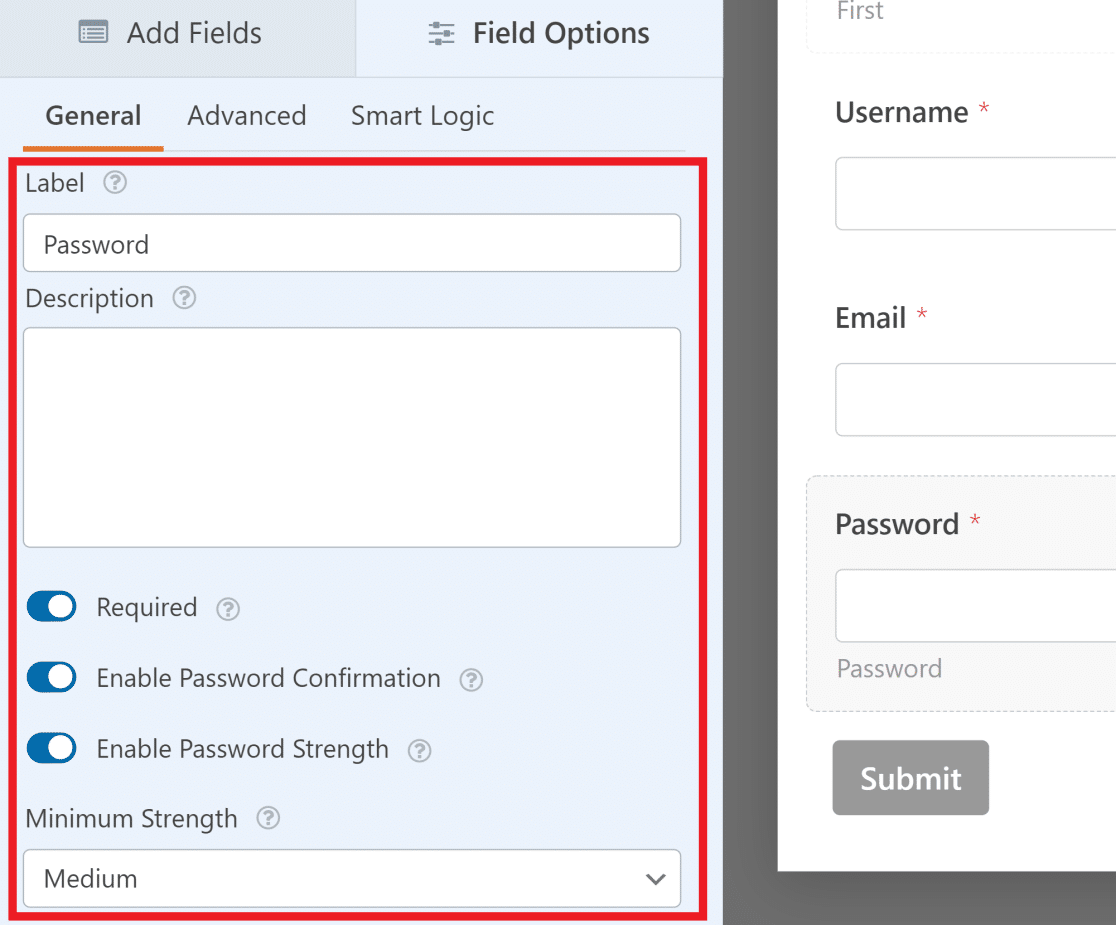
These options are exceptionally handy if you'd like to make sure your users sign up with strong credentials and foreclose the adventure of hacking.
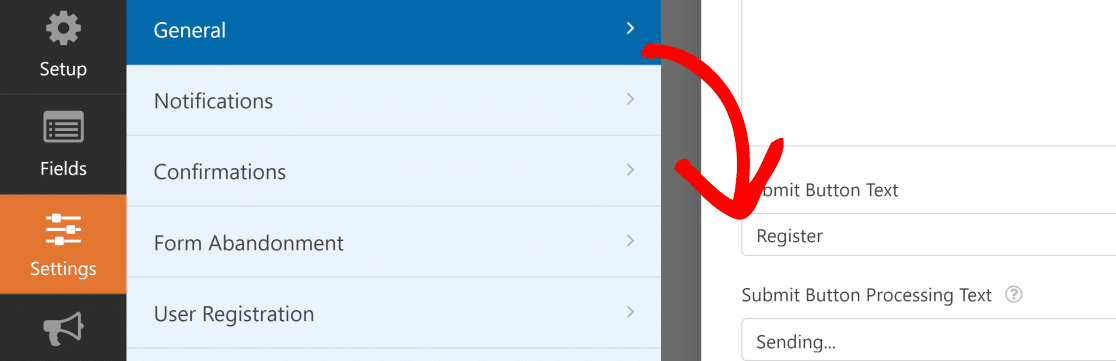
Likewise, you might want to change the label of the Submit push on the bottom of the course then that information technology reads Register instead.
To do this, click on the Setting button on the menu on the left then click General. From hither, simply edit the text under the Submit Button Text field.
In one case you're done customizing your form, click Save.
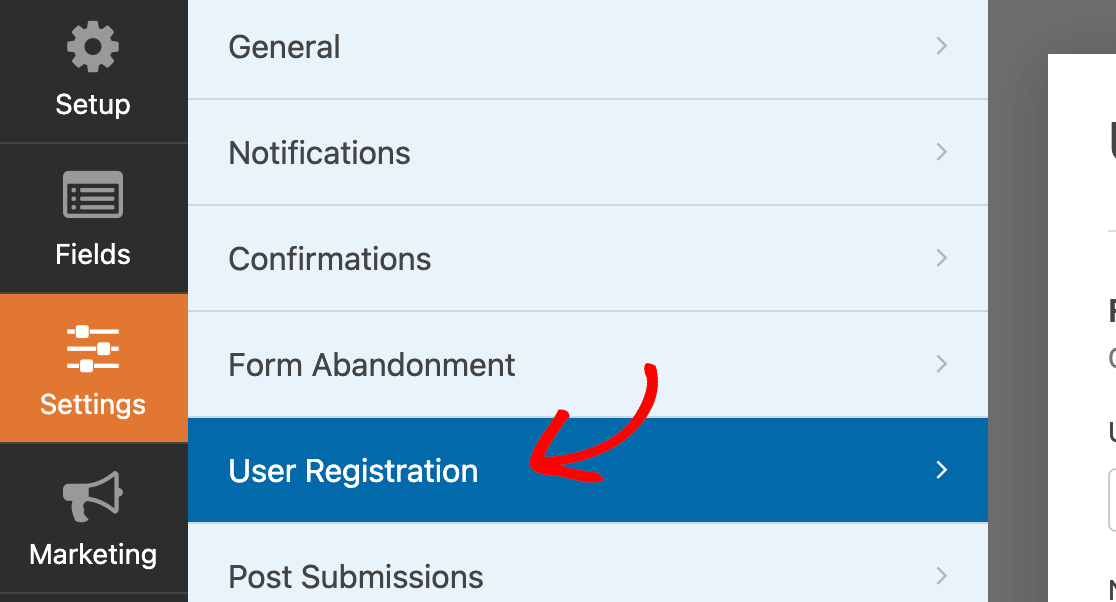
Step five: Configure WordPress User Registration Form Settings
In this step, we'll map our class fields to the WordPress user profile and assign a user role to new users.
To start, click on Settings » User Registration.
At present, click on the button adjacent to Enable User Registration to enable it.
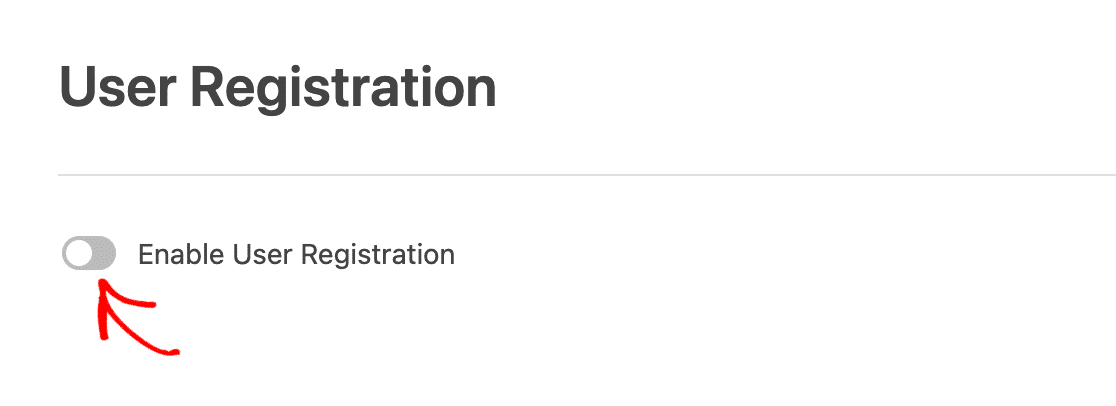
On this page, you can do the following:
- Map each grade field
- Select default user roles
- Enable notifications
- Select which confirmation page to redirect users to
For field mapping, simply employ the dropdowns to select a field from your form that corresponds to the user profile field.

Scroll downward to the User Rolessection to assign i of your WordPress site's predefined user roles to new users.

In the next step, we'll configure the user activation method.
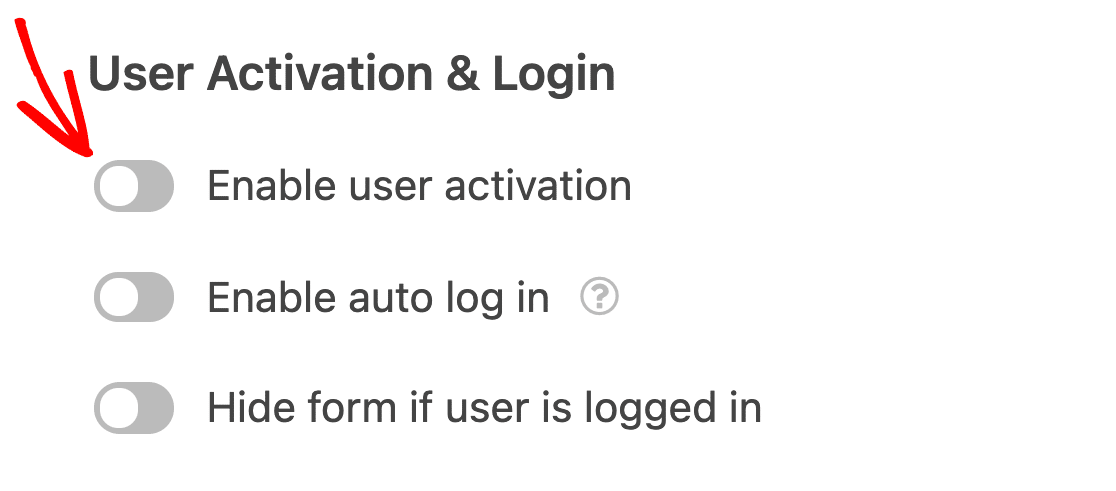
Footstep vi: Configure User Activation Method
If yous scroll down from the User Roles department, you should see User Activation & Logins section. We recommend toggling on the Enable User Activation button if y'all desire to prevent spam signups and command user activations.
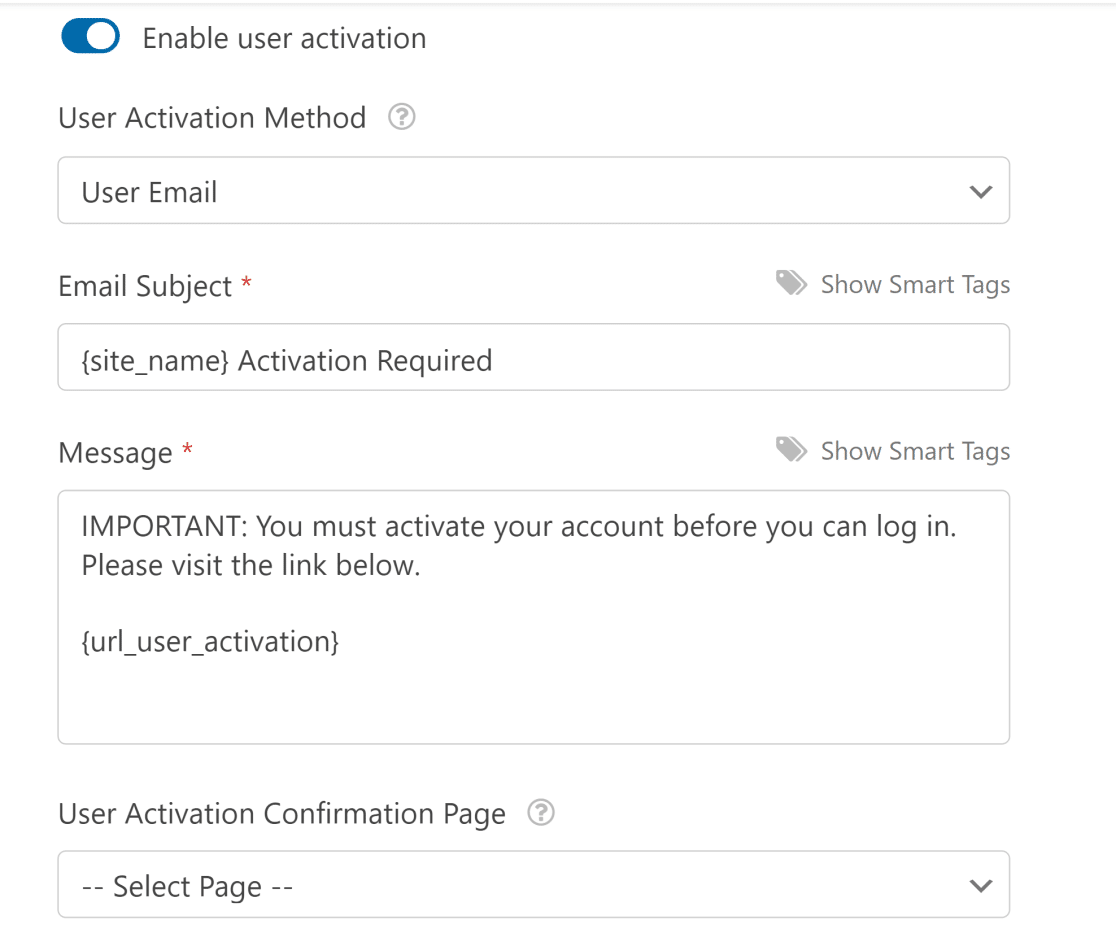
WPForms gives you two user activation methods:
- User Email
- Transmission Blessing
The User Email method is more convenient if in that location are lots of people signing up to your site every day. Plus, it will help forbid spam user registrations and crave all new users to consummate their registration using a special link sent to their provided email accost.
You can customize the email subject, message, and select a User Activation Confirmation Page to brandish when a user clicks the activation URL in their email.
Note: Brand sure you've already created the page confirmation page on your WordPress site so that you can select it in the User Activation Confirmation Page dropdown.
If y'all select the Manual Approval method, site admins volition need to approve each user on the backend to confirm registration. This can exist fourth dimension-consuming.
Once you're done configuring the user registration settings, click Save to store your changes.
Stride vii: Change Email Notification Settings
Scrolling down further from the settings in the above department, you should now find the Email Notifications section. This gives you the following notification options:
- Transport email to the admin when a new user registers.
- Send email to the user with the account information they entered during signup.
- Send email to the user in one case their account has been activated.
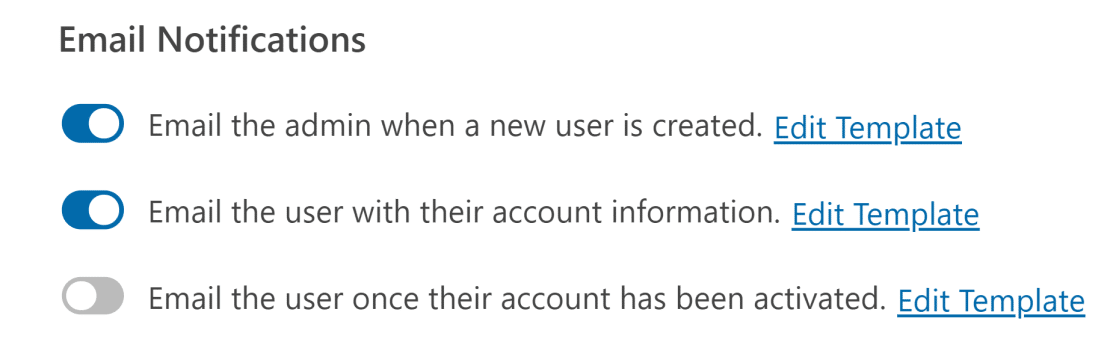
If you want to edit the header and content of these emails, y'all tin can do so by simply clicking on the Edit Template push next to each notification type.
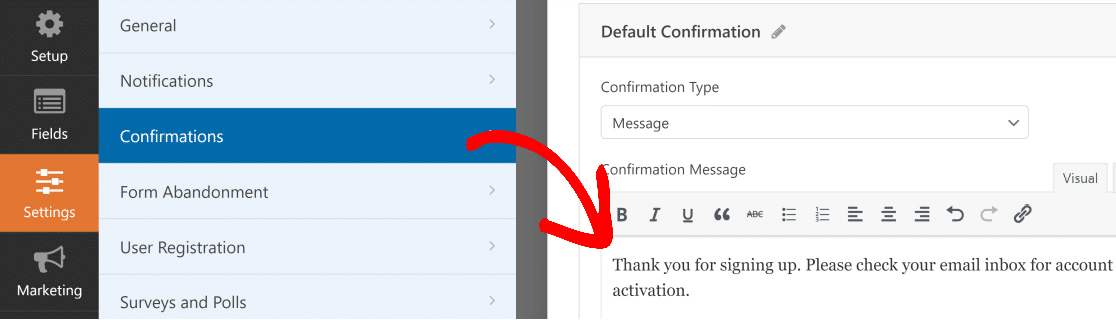
Step 8: Edit On-Page Registration Course Confirmation
Apart from the notification emails, WPForms besides displays a confirmation bulletin to the user when they submit the form.
WPForms has three confirmation types to choose from:
- Bulletin. This is the default confirmation blazon. When a user completes your registration form, a simple message confirmation will appear letting them know their form was processed. Look hither for some great success letters to help boost client happiness.
- Show Folio. This confirmation type takes users to a specific web page on your site thanking them for registering. For assist with this footstep, check out our tutorial on redirecting customers to a thanks folio. In addition, exist sure to check out our article on creating effective Thank You pages for boosting client loyalty.
- Go to URL (Redirect). This selection is used when you want to send customers to a different website, such equally an eCommerce site y'all're an affiliate for.
You can customize confirmations past clicking on Settings » Confirmations. In this case, nosotros used the default Confirmation Type (Message), only nosotros edited the message to include instructions for the user.
If you want to automatically log new users into their newly created WordPress business relationship, rather than testify them a thank you bulletin after registering on your website, check out this article on how to set up WordPress registration redirects.
Don't forget to Saveyour changes. Next, we'll embed and publish the form on your site.
Step ix: Configure User Registration Marketing and Payments (Optional)
Y'all tin can combine your site's user registration forms with our e-mail marketing addons like Mailchimp, AWeber, Campaign Monitor, and GetResponse.
This allows yous to automatically add all registered users to your email marketing listing. You can even add together them into various marketing automation sequences from there.
In addition, you tin can configure your user registration forms to accept payments using our payment addons Stripe, Qualify.Net, PayPal, and Square. This is perfect if you desire to run a membership site and want to accept payments while a user is registering for your site.
To configure the payments settings on your user registration form, y'all'll showtime have to install and actuate the right payment addon.
For like shooting fish in a barrel step-by-step instructions, cheque the following tutorials:
- PayPal addon installation
- Stripe addon installation
- Qualify.Cyberspace addon installation
- Square addon installation.
Footstep ten: Add together the User Registration Class to Your Site
After you lot've created your WordPress user form user registration and login grade, you need to add information technology to your WordPress website.
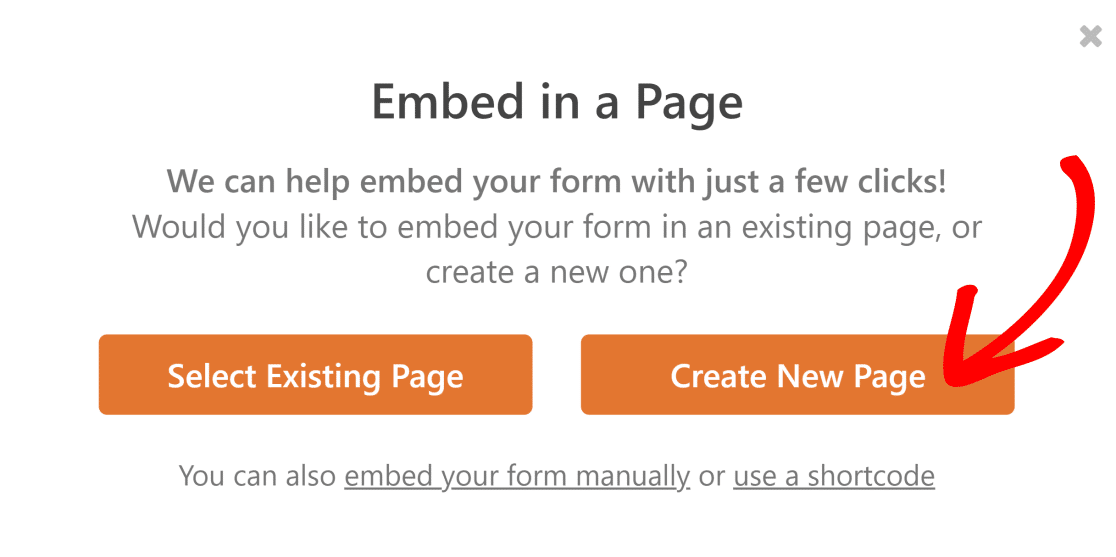
Click on the Embed button on the top-right of the class builder screen.

At present, select Create New Page.
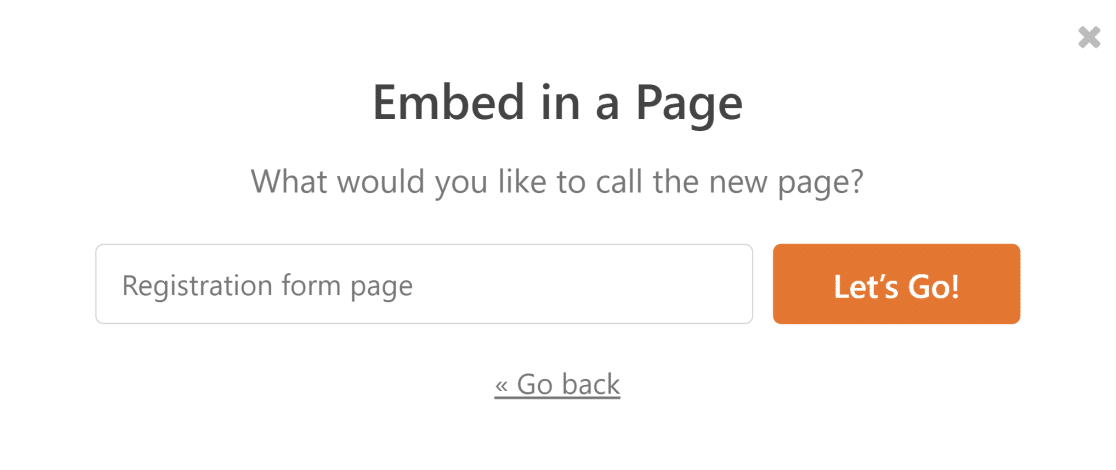
Give your new folio a name then click Let's Go.
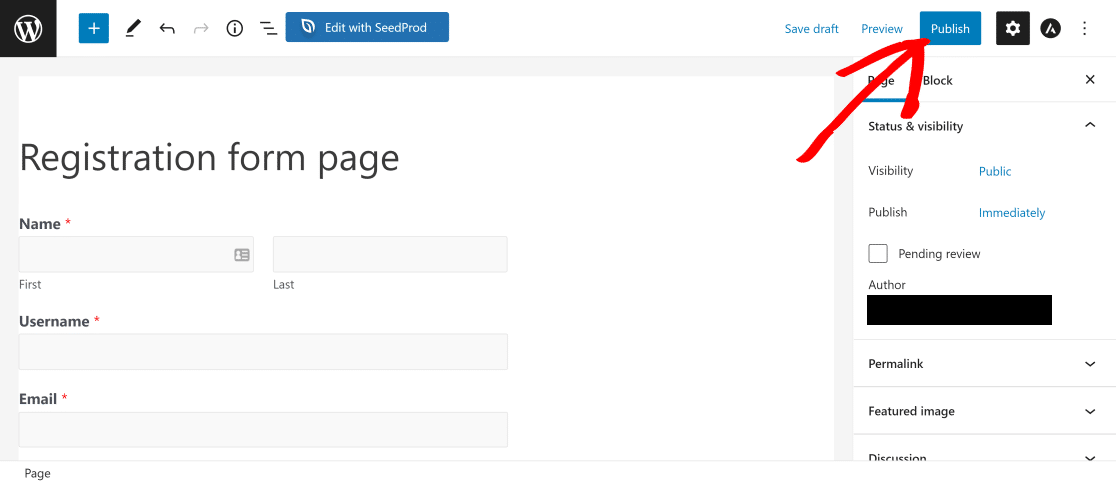
WPForms will now take you to your WordPress editor with your new registration form already embedded within. When you lot're ready, click on Publish. With WPForms, this is all you need to practice to add your registration grade to your WordPress site.
And that's it! Yous now know how to make a WordPress registration class to enable an easy signup procedure for new users on your site.
Next, Run a Successful Giveaway
Now that you're getting new registered users on your site, it might be a adept thought to farther increment your followers by running an Instagram giveaway. Check out these tips for running an Instagram giveaway, to launch a successful one.
Likewise, did you know that yous can let users preview their form entry before submitting it? See our commodity on how to preview a form entry before submitting it for more details.
Create Your User Registration Form Now
So, what are you waiting for? Get started with the well-nigh powerful WordPress drag and driblet grade builder and WordPress user registration plugin today. The Pro version of WPForms has a free user registration form template.
And don't forget, if you similar this article, then delight follow us on Facebook and Twitter.
williamslande1963.blogspot.com
Source: https://wpforms.com/how-to-create-a-user-registration-form-in-wordpress/
0 Response to "Wordpress Plugin Media Modal Upload Custom Folder Stackexchange"
Post a Comment